When I started using Google Analytics 4, I had no idea what I was looking at. All the event tracking options were new to me, and I felt lost trying to figure out what to track on my website.
I spent months learning GA4 the hard way, through trial and error on my own sites and by helping other website owners set up their tracking. Now I know exactly which events you need to watch and which ones don’t matter for your website’s growth.
That’s why I put together this simple guide to GA4 events. You’ll learn what each event means and how it can help you grow your website. Don’t worry if you’re new to analytics or just moving to GA4 – I’ll walk you through everything step by step.
What Are Events in Google Analytics?
GA4 events are like a visitor’s digital footprint on your website. While a pageview just tells you someone looked at a page, events show you exactly what they did there, like clicking a button, watching a video, or filling out a form.
In the old Universal Analytics, we had to set up different types of “hits” like pageviews, events, and transactions separately. But GA4 makes things simpler by treating everything as an event, even basic actions like when someone views a page or starts a new session on your site.
I learned this lesson the hard way with my first online store. When I only tracked pageviews, I couldn’t figure out why people weren’t buying. Once I started tracking events like “add to cart” clicks and form abandonments, I knew where customers were getting stuck and could fix those issues.
Types of Events in Google Analytics 4
Now that you understand what events are, let’s look at the four main types of events in GA4. Each type serves a different purpose, and knowing when to use each one will help you track exactly what matters for your website.
| Event Type | Description | Automatic? | Example Events |
|---|---|---|---|
| Automatically Collected Events | Basic events GA4 tracks without any setup | Yes | page_view, first_visit, session_start, user_engagement |
| Enhanced Measurement Events | Additional events that can be enabled with one click | Yes (when enabled) | scroll, file_download, video_play, outbound_click |
| Recommended Events | Pre-defined events that follow Google’s naming conventions | No | purchase, add_to_cart, begin_checkout, login |
| Custom Events | Events you create to track specific actions on your site | No | newsletter_signup, product_review, contact_form_submit |
1. Automatically Collected Events
These are the events GA4 tracks for you right out of the box. You don’t need to set up anything, as they start working as soon as you add the GA4 tracking code to your website.
In my experience, automatic events give you a good base level of data about how people use your site. For example, GA4 automatically tracks when someone starts a new session, clicks on a file download, or scrolls down your page.
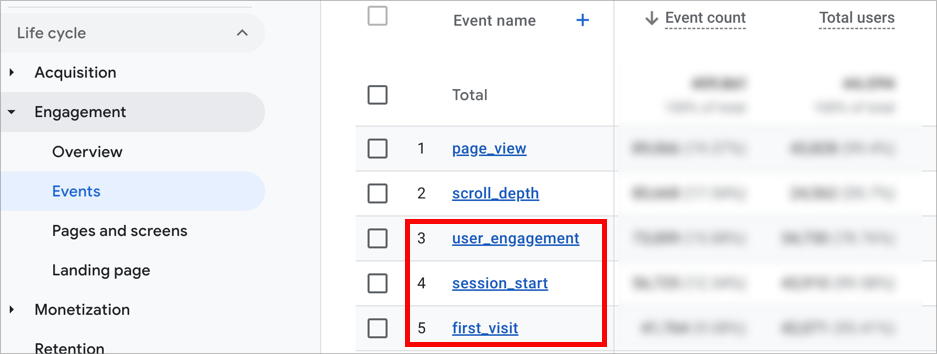
Here are the most useful automatic events I rely on:
- first_visit: Shows when someone visits your site for the first time
- session_start: Tells you when a new viewing session begins
- page_view: Records each time someone looks at a page
- user_engagement: Shows if visitors are actually engaging with your content
- file_download: Tracks when someone downloads your files
2. Enhanced Measurement Events
Enhanced Measurement events are a step up from automatic events, but they’re still easy to use. Think of them as bonus tracking features you can turn on with just one click in your GA4 settings.
I use these events on most sites I manage because they tell me more about how visitors interact with specific parts of my pages. For example, I can see if people are watching my videos or clicking on outbound links to other websites.

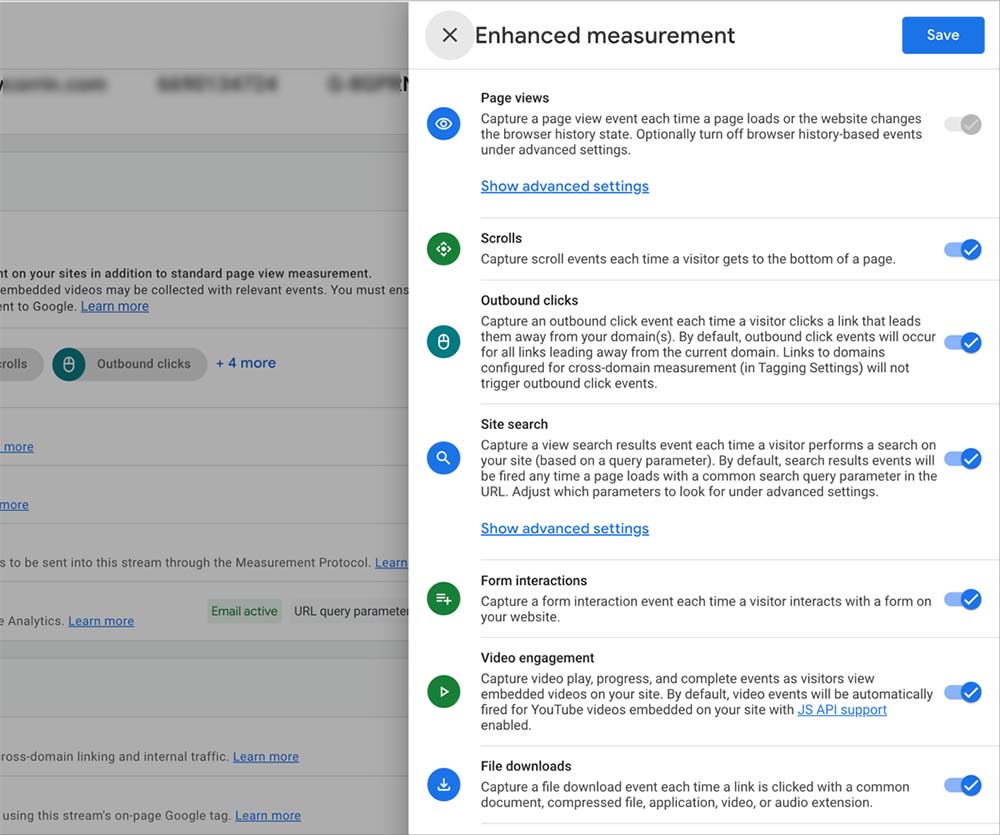
Here’s what Enhanced Measurement can track for you:
- Scroll tracking: Shows how far people scroll down your pages
- Outbound clicks: Records when visitors click links to other websites
- Site search: Tracks what people look for using your website’s search box (but only if your site uses standard search URLs with query parameters like “?s=” or “?search=”)
- Video engagement: Measures if people play, pause, or finish watching your videos
- Form interactions: Shows when visitors start filling out your forms
To turn these on, you just need to visit your GA4 settings and check a few boxes. I’ll show you exactly how to do this in the setup section later.
3. Recommended Events
These are events that Google suggests you set up based on what kind of website you have. Unlike automatic events, you’ll need to add some code to track these, but Google provides clear guidelines on how to set them up.
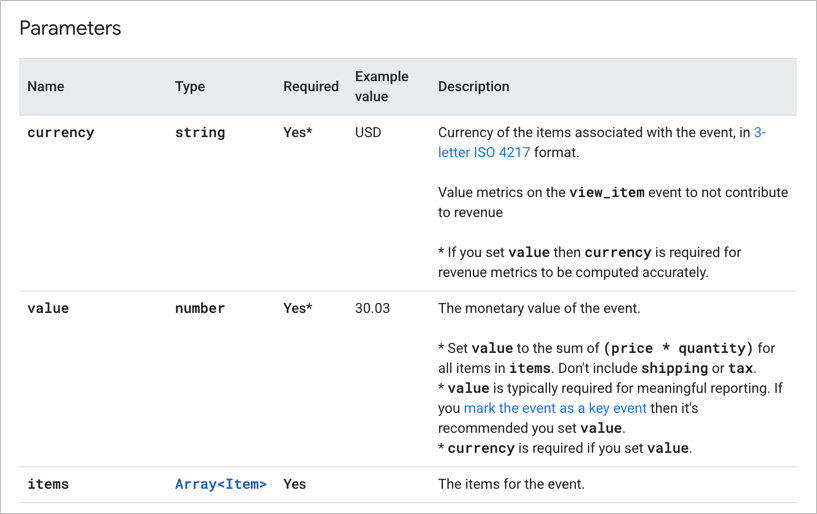
For example, here are the parameters Google suggests using for the add-to-cart event:
I started using recommended events when I noticed gaps in my tracking data. For example, on my online store, I wanted to know more than just my final sales, I needed to see the whole buying journey.
Recommended events helped me track things like when people viewed products or added items to their cart.
Here are some popular recommended events I often use:
- sign_up: Tracks when someone creates a new account
- purchase: Records when someone buys something
- generate_lead: Shows when someone fills out a contact form
- view_item: Tracks when someone looks at a product
- add_to_cart: Records when items are added to shopping carts
The nice thing about using recommended events is that they work with GA4’s built-in reports and tools. This means you’ll see your data in the right places without extra setup.
4. Custom Events
Custom events are like building your own tracking system. When the automatic, enhanced, and recommended events don’t track exactly what you need, that’s when custom events come in handy.
On my blog, I wanted to know when people clicked on specific buttons or reached certain spots in my articles. These weren’t actions GA4 tracked automatically, so I created custom events. While this takes more work to set up, it gives you the exact data you need.
Some useful custom events I’ve created include:
- Reading progress (25%, 50%, 75% of an article)
- Newsletter popup interactions
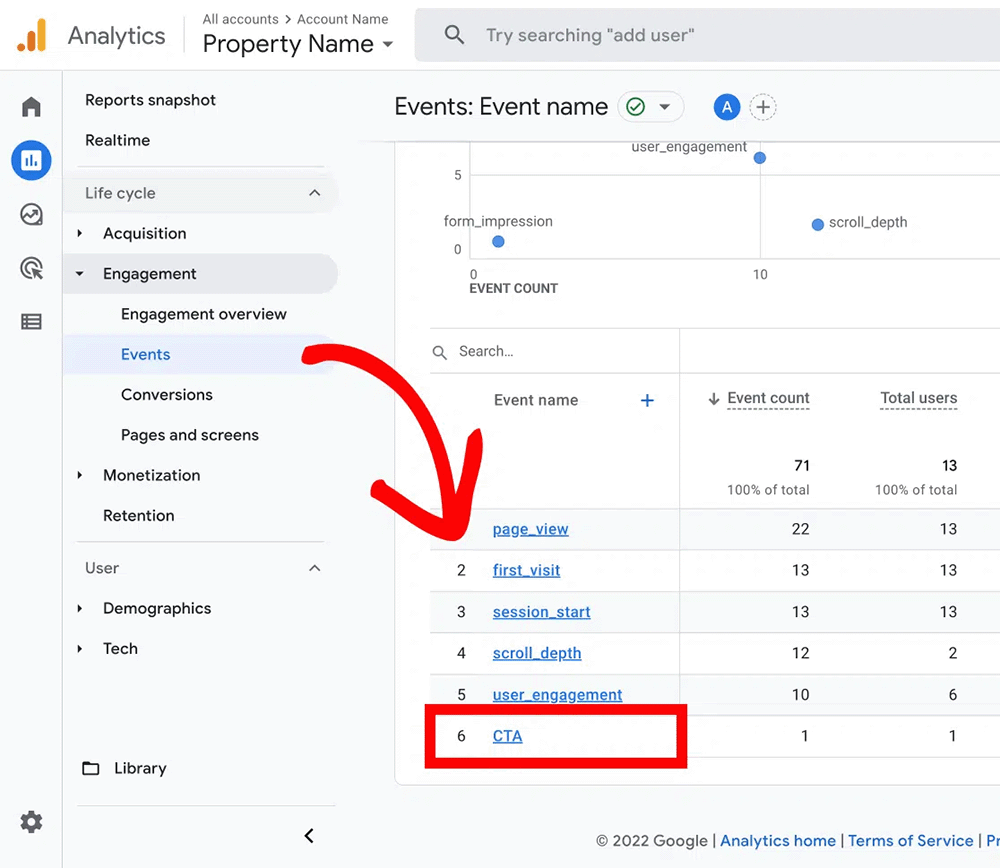
- CTA clicks on landing pages (as seen in the screenshot below)
- Time spent on pricing tables
- PDF document views
Just remember to keep your custom event names simple and consistent. I learned this the hard way – messy event names make it really hard to find the data you need later.
Setting Up and Tracking Events in GA4
When I first set up event tracking on my own website, I was overwhelmed by all the options. But after learning GA4 and seeing what actually matters for growing my site, I can now show you the simplest way to get started.
The first thing you’ll need is a GA4 property and your tracking code installed on your website. If you haven’t done this yet, check out my guide on how to add Google Analytics to your website.
Setting up Automatic and Enhanced Measurement Events
To turn on Enhanced Measurement in GA4, first log into your Google Analytics account and click on Admin in the bottom left corner.
Next, look for Data Streams in the middle column and click on your website’s data stream.
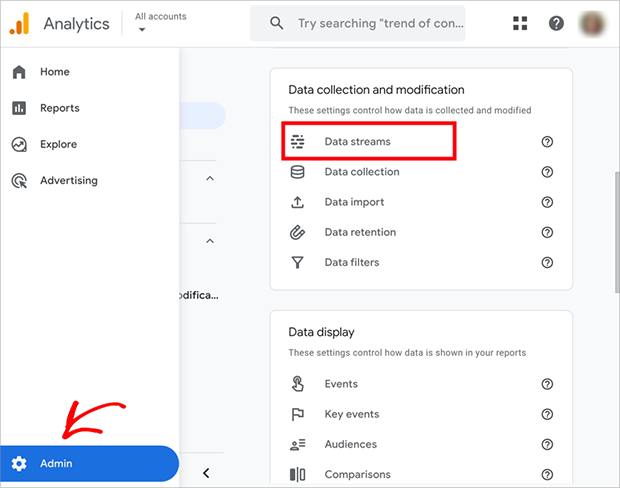
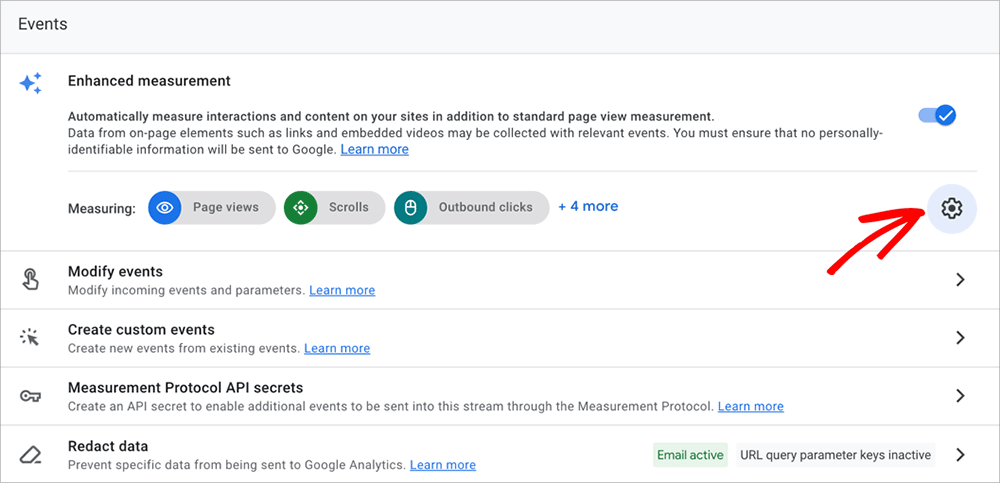
You’ll see Enhanced Measurement settings with a gear icon, so click that to see all your tracking options.
I started by turning on all enhanced measurement options on my site. This gave me a good baseline of data, and I could always turn off the ones I didn’t need later.
Setting Up Recommended and Custom Events
To set up recommended events in GA4, you’ll need to add some code to your website. The easiest way to do this is with Google Tag Manager.
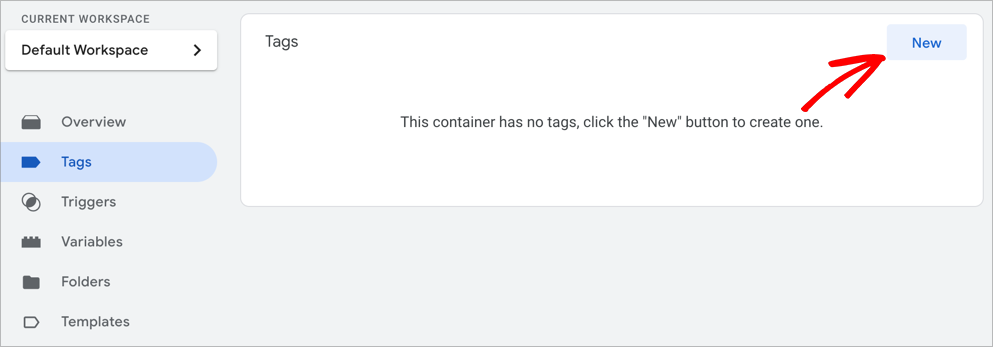
First, log into your Tag Manager account and click on Tags in the left menu. Then click New to create a tag for each event you want to track.
Here’s how I set up purchase tracking on my website using Tag Manager:
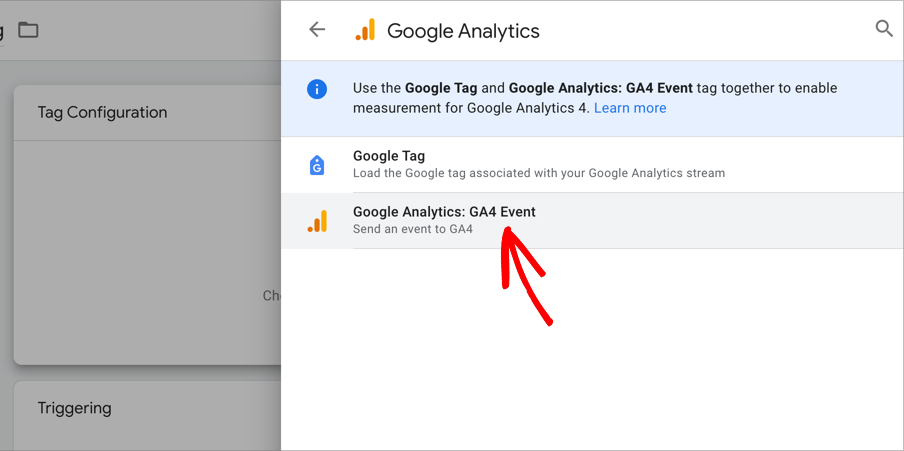
Click on “Tag Configuration” and choose “Google Analytics: GA4 Event” from the list.
Next, type “purchase” as your event name. Under Event Parameters, add important details like value, currency, and items. These help GA4 understand what was purchased.
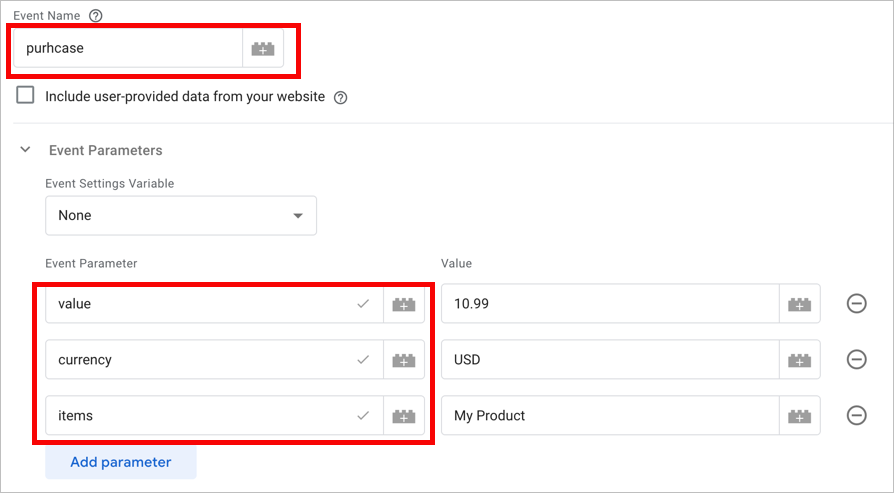
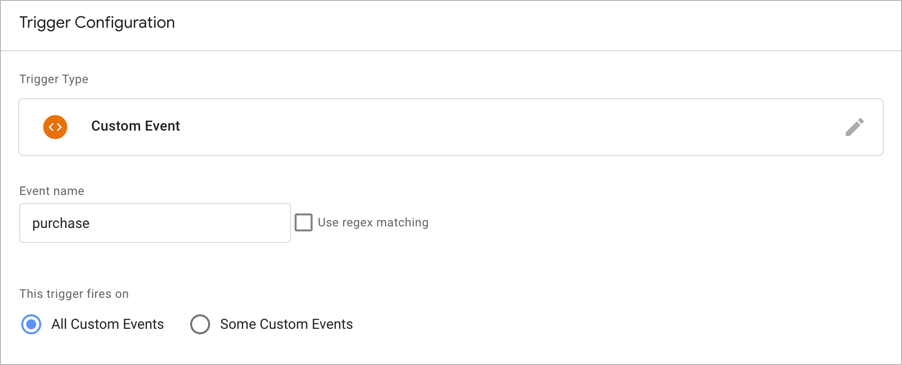
The tricky part is setting up the right trigger. For purchase events, you’ll usually need to set up a custom trigger that watches for specific checkout completion signals from your website.
For custom events, the process is similar, but you get to choose your own event names.
On my site, I wanted to track when people clicked my newsletter signup button. I created a custom event called “newsletter_click” and set it to trigger whenever someone clicks that specific button.
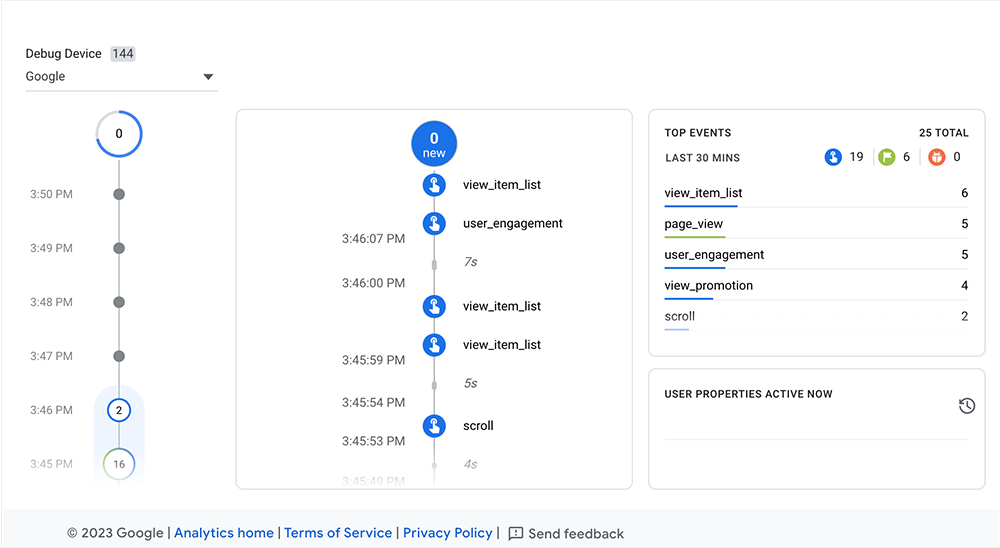
Remember to test your events after setting them up. You can use GA4’s DebugView to make sure everything is working correctly.
How to Simplify GA4 Event Tracking
Having spent hours digging through GA4’s complex reports to find my event data, I knew there had to be a better way. With all the automatic, enhanced, recommended, and custom events we just set up, I needed a simpler way to see what was actually working. That’s why I started using OnePageGA.
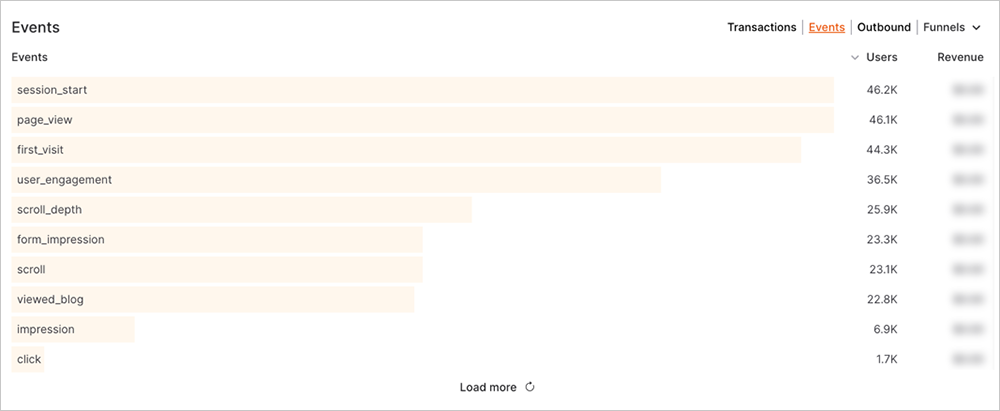
OnePageGA turns all your event tracking data into simple, easy-to-understand reports, all on one page. You don’t need to install any plugins or touch any code. Just connect your GA4 account, and you’ll see all your events in a way that actually makes sense.
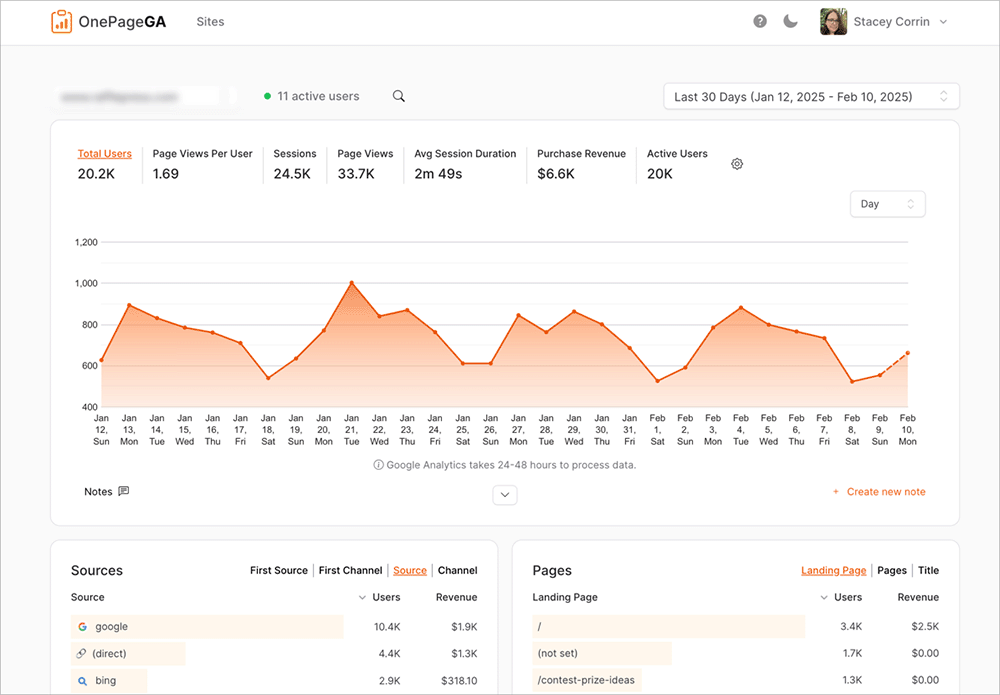
I love using OnePageGA because it saves me so much time checking my events. Instead of clicking through GA4 menus, I can instantly see which events are firing, how many conversions I’m getting, and where people are dropping off in my funnel. It shows me exactly how visitors interact with my site without the technical analytics language.
Another big plus is that unlike other GA4 alternatives, OnePageGA doesn’t charge based on how many events you track or how many page views you get. Your cost stays the same even as your tracking needs grow.
You get access to everything: event tracking reports, conversion funnels, eCommerce events, and even multiple website tracking from one dashboard.
Ready to make your event tracking simple again? Try OnePageGA free for 14 days.
Frequently Asked Questions About GA4 Events
What are Google Analytics 4 events?
Events in GA4 are actions that visitors take on your website. They show you exactly what people do – from viewing a page to clicking a button or making a purchase. Every interaction on your site can be tracked as an event in GA4.
How do automatically collected events differ from enhanced measurement events?
Automatically collected events start tracking as soon as you add your GA4 code – things like page views and first visits. Enhanced measurement events need to be turned on in your settings, but give you more detail like scroll tracking and video plays. I use both types because they work together to give me a complete picture.
Can I customize recommended events?
Yes, you can customize recommended events. While Google suggests specific names and parameters for these events (like “purchase” or “sign_up”), you can add your own parameters to collect extra details that matter for your business. Just remember to keep the main event name the same so GA4’s reports work correctly.
How do I document and debug my custom events?
I use GA4’s DebugView to test all my custom events. To access it, click Configure, then DebugView in GA4. For documentation, I keep a simple spreadsheet listing each event name, what it tracks, and any custom parameters. This helps me stay organized and makes it easier to update events later.
Get Started With GA4 Event Tracking
Event tracking in GA4 might seem complicated at first, but it doesn’t have to be. Start with the automatic events, turn on enhanced measurement, and slowly add recommended and custom events as you need them.
Want to make event tracking even easier? Try OnePageGA free for 14 days and see all your event data on one simple dashboard.
No complicated menus, no technical jargon, just clear insights about how people use your website.
And if you’re looking for more ways to understand your website’s traffic, see our other guides and resources:
- How to Find Your Top Converting Traffic Sources in GA4
- What Is a User in Google Analytics? Total vs Active vs New vs Returning
- Types of Web Analytics Every Website Owner Should Know
- What Is a Metric in Google Analytics (And What to Track)
If you have questions or want to join the conversation, you can also find us on X and Facebook.
